In this article, I’m going to show you how to get your song produced in Ableton ready for mixing and mastering.
Follow these easy-to-do steps and you will get the job done in a FEW CLICKS ONLY.
Without many words let’s see how to bounce stems in Ableton Live step-by-step!
Step 1
Name each channel clearly and intuitively to ensure easy understanding by engineer who's going to mix the song.
For example: Main Vocals, Double Vocals, Harmony 1, Harmony 2, Kick, Bass, and so on.
Step 2
Make sure to disable all of the processing on the Individual Channels and Master Bus. All of the EQs, Reverbs, Delays, Compressors, and Limiters - these effects aren't part of sound design and arrangement. It's better to turn them off to leave the most options for further processing at mixing and mastering stage.
Effects that are better to keep ON: Filtering automation, Sidechain, Distortion, Overdrive, Chorus, Phaser, Flanger, Vocoder, Pitcher, other creative effects. Keeping them applied when exporting stems will give the engineer an exact picture of your creative ideas.
IMPORTANT - mute AUX busses if you have any sends to effects like Reverb, Delay, or Distortion.
Step 3
Set a loop brace along the full length of the song by dragging the Loop Start and Loop End points into position. You can also set a loop brace for a specific time range. Also, ensure the Loop End point does not cut off any effect tails from reverb or delay.
Step 4
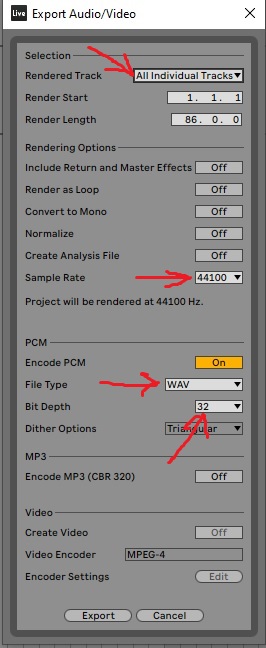
Choose Export Audio/Video from the File menu or use the shortcut Shift+Cmd+R [Mac] or Shift+Ctrl+R [PC]. And set it as shown in the picture

