Hey!
Let’s talk about acoustic guitar quality recording at home! Despite millions of miths, this can be done quite easily and what’s super important - on budget!
Let’s start with the gear that you will need
Any quality audio interface and condenser microphone (the one that you using for vocals) will be enough to start with. Later when you know for sure what you want from your next recording you can experiment with different microphones to see what’s best for the particular task.
Yet again – any studio-grade microphone that you already own is great to start with!
The same goes for the audio interface – when you grasp the basics of acoustic guitar recording and start wanting more, then you can consider buying a more advanced interface. But hold on – we’ll talk about it later! It’s still going to be a very simple concept to understand.
And of course, you will need a mic stand – to point out the microphone to a specific area of the guitar.
That’s it – if you have these three simple pieces of gear, you’re ready to get a quality recording at home!
Where to place the microphone?
This is the most often asked question when it comes to recording of acoustic guitar!
Spot 1
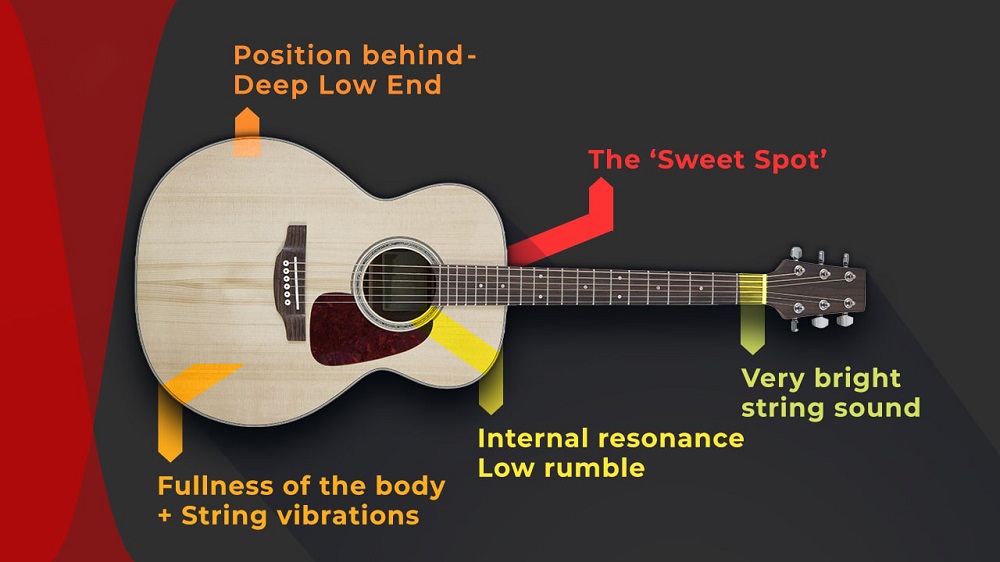
And the answer is upper simple – if you want to get a well-balanced, full sound, the surefire way is to place the microphone opposite the twelfth fret. About 2 inches from the fretboard.
This is a so-called sweet spot that gives you a nice balance of fullness and clarity of acoustic guitar.
So easy!
Just plug a mic into audio interface and place it at the sweet spot. Boom – you got a perfectly recorded acoustic guitar!
We could actually stop here because this simple technique will be enough for the majority of your creative tasks. But let’s get into the depth!
While staying at this sweet spot you can alter the tone of the recording by changing the place where you strumming. Moving the pick towards neck you will get a warmer, more round tone of acoustic guitar. And vice versa – by strumming closer to the bridge you will make the guitar sound less warm while with more definition.
Spot 2
Placing microphone opposites the fretboard worth experiments. I’d recommend to try taking the sound from lower frets too. I personally liked positions around 5th-7th frets. The guitar tone becomes not as full of body but still balanced and can be used in dense arrangements somewhere on the background.
And don’t forget that you can alter the tone by where you strumming the strings!
Spot 3
The area opposites 1st fret is where you can record the brightest sound from acoustic guitar.
Now we’re getting to the point when you might want more!
More body, more definition, more bass, anything…
This is when you will need another microphone to use it along with the one that you started with.
And this is when you will need a more advanced audio interface that has more than one audio inputs. Because you’re going to record 2-3 mics simultaneously!
The technique is simple.
Place one microphone at sweet spot (12thfret), and the other mic(s) – opposites of one of the other areas. Signals from these microphones will be recorded on two independent tracks in the DAW. Once you done with recording you can balance these signals to get the needed tone.
This can be:
- fretboard at 1st fret known for the brightness and definition
- guitar body front panel (closer to the lower bout). It’s usually used when you want to get the sound as fullest of body
- guitar rear panel closer to lower bout – for when you want deep bass sound
By combining these signals you can shape acoustic guitar tone in an advanced way!
Now you’re ready for experiments!
