Hello everyone!
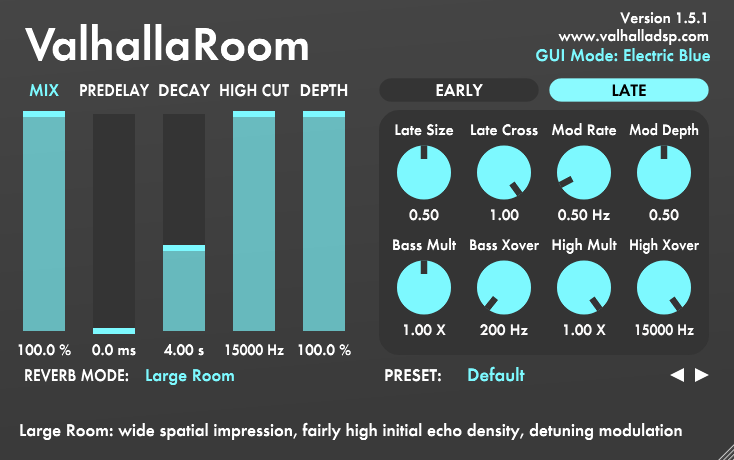
Elijah from EKmixmaster.com here and today I wanna talk about my go-to reverb plugin, and the key features that make it so much loved by me and allow me to cover most of the creative tasks.
Most of the times you hear Halls, Rooms in my mixes – they are created with this just one plugin.
We’re not talking about spring reverb plugins today – they are a whole different story!
So, the key features to any reverb unit, either software or hardware are:
Decay
Which in simple words means the reverb tail duration, how long it takes for the reverb to fade out completely. And it can be easily adjusted by a big easy-to-use slider on the plugin interface.
Depth
How subjectively close or far does the processed signal, sound to you. Technically we’re talking about the percentage of early and late reflections in the reverb.
Unfortunately, not all of the reverb units have this sort of setting. Pity!
So in Valhalla Room this can be easily adjusted with the slider labeled “Depth” where lower numbers mean the early reflections percentage is increased, while the level of the late reflection is lowered.
Just to be clear Valhalla Room isn’t unique in having this option. There are other pieces of software with the same.
So when you see knobs, or sliders that adjust the balance of ER (early reflections) and Tale or LR (late reflections). Or sliders that adjust ER and LR level in dBs – you’re dealing with whole the same option. And it’s only about what’s most convenient for you personally.
Color
The third key thing to every reverb.
Again in simple words, it means how much certain frequencies are represented in the processed signal. We’re talking about simple Eqing. Which allows us to sculpt the tone of the reverb and making it blended perfectly with the rest things in the mix.
In Valhalla Room, this feature is represented with just one slider – the Hi-Cut filter. Believe me – it’s used very often! You will start shaping your reverb with this thing most of the times!
In some other reverb plugins you can find a more advanced EQ section. While there’s nothing like that in Valhalla Room.
To be honest this has never been a problem for me! Because we’re still talking about simple EQing. And I prefer doing it with EQ that I’m super fluent in using.
To me, equalizers built into reverb plugins overload the interface and are not always convenient to work with. Just because you can’t place all of the bells and whistles in just one user interface and still keep things user-friendly.
So instead of messing with tiny-looking EQ, I grab my favorite one, that can be stretched out to any size.
So, Decay, Depth, and EQ are more than enough to cover most of your creative tasks. And all of these are represented on the main window of the plugin and can be accessed easily.
Oh, and keep in mind that the plugin has multiple reverb algorithms and a very transparent and freely adjusted user interface size.
Now let’s get to the practice
We’ll use it on vocals. Because mixing vocals is a stumbling block for many.
Let’s create Hall reverb
Usually, I start with something in between 2 - 4 seconds and Depth set to the maximum.
Here you go – you got lush-sounding deep hall reverb with just simple moves!
The next step is Hi-Cut filtering.
To cut highs or not depends on a particular creative task. Cutting off some Highs helps make the hall reverb subjectively even deeper, and warmer. Plus most likely high frequencies of the reverb will interfere with Hi-Hats and Cymbals in the arrangement. So it’s a good idea to chop them off a little bit – it will help get clearer production!
Now say you want to place vocals in a more intimate space
Usually, it means shorter reverb and less depth, less present late reflections in the reverb.
Try Decay numbers about 1 - 2 seconds and grab the Depth slider down until you can’t separate Vocals and Reverb by ear. Somewhere aroun 20-30% is fine.
The reverb gets almost unnoticeable and you might ask what’s the point of using it then. But turn it on/off a few times and you’ll hear that when it’s off the vocals gets bare and too dry. It’s not as warm and thick and easily gets lost in the mix.
You can go even further and create a very tight deep room
Just set the Decay at about 1 second and Depth to the max. A little bit of pre-delay will help it sound even more interesting!
So these are the basics of using the Valhalla Room plugin which also works for other reverb software or hardware units! Hope you’re going to have fun experimenting!
Any specific topic that you'd want to learn about?
Any other questions?
Feel free to ask - I'd love to help!
