Vocals are the main part of any song in most genres. You can optimally record your voice at home. However, it doesn't hurt to improve and optimize the recording so that it sounds more professional.
Frequency response optimization - corrective equalizer
To do this, it is advisable to first listen to the recording of the solo. If your recording is discolored due to a sub-optimal microphone or unwanted room resonance, these problems should be corrected or minimized with an equalizer. What can be done?
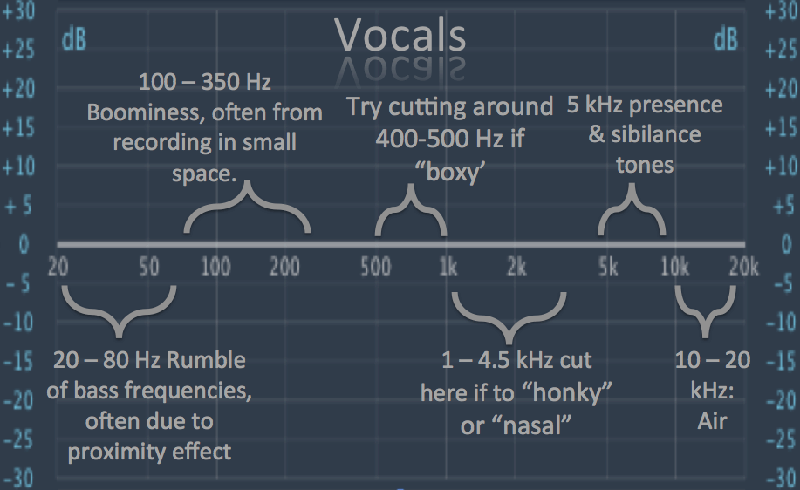
Filter out very low frequencies. This is where unwanted noises often occur, such as footsteps, movement, clapping sounds, etc. When adjusting the low pass filter, always listen to the voice in context with the music to appreciate when it starts to sound unnatural or thin. If low frequencies sound good without processing, then leave them alone and do not add an unnecessary filter just out of habit.
If your recording has a slightly breathy sound, try cutting the mids in the 350-800Hz range. If the recording is buzzing, try a medium-width cutoff in the 100-300 Hz range. If the recording sounds too harsh, try reducing the frequency range from 1 to 3.5 kHz. If the recording sounds sizzling, try cutting above 4-5kHz.
If your recording sounds too dispassionate, cold, you can try enriching it with harmonic distortion. For this, preamp simulations, tape simulations, distortion, overdrive, waveshaper and the like are suitable. But don't overdo it. You should feel the effect more than hear it directly.
Try some light vocal compression. As in the previous point, it's the same here: less is more - especially if you are not sure how to properly set up the compressor and do not hear its artifacts.
Parallel rap compression. A much better and more elegant way than direct compression is parallel processing with one or more compressors. To do this, you leave your vocal track completely uncompressed and send it to the bus via a send. You then take this copy of the signal to one or more parallel auxiliary channels and insert one or more different compressors there. Then you quietly mix these compressed signals into the main track, and then you get amazingly powerful sound without risking direct compression artifacts on the main track.
Edit your voice with De-esser. It is similar to a compressor, but only reacts to hissing sounds and makes them quieter. Here you have to compress any prominent peaks above 3-5kHz to achieve a nice flat sounding vocal.
Improve the sound of your voice with the equalizer. This is where the creative part of voice editing comes in. Now we are talking about the sound design and the color of the mix. To do this, it is recommended to use an equalizer and purposefully boost high, low or mid frequencies to make the voice more silky, and rounded.
More specialized processors for emergencies.
Exciter. If the recordings are too boring despite the high-end boost, the exciter can be a lifesaver in an emergency.
Dynamic equalizer, multi-band compressor. If some frequencies only stand out in some places, you can dynamically lower them using these tools. Here you should always use only the appropriate frequency band and leave the rest unprocessed or switch to bypass.
Guitar amp. If your vocals don't fit in the mix or you're looking for a more creative sound, try amp simulation on vocals - it also works well in parallel.
Of course, good vocal sound often includes reverb, delay, and modulation effects. But we can talk about this next time.
