In this article, I’m going to show you how to get your song produced in FL studio ready for mixing and mastering.
It’s far not that complicated as you might have been thinking! Follow these easy-to-do steps and you will get the job done in a FEW CLICKS ONLY.
Without many words let’s see how to bounce stems in FL studio step-by-step!
Step 1
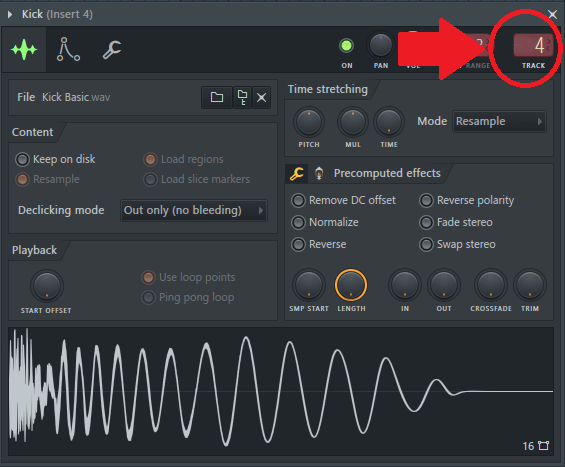
To export all the tracks in your song the way you want, you need to make sure every single piece of audio in your playlist is sent to a mixer track. You can see this in the channel settings.
This way when the song is exported all of the arrangement details will be kept.
Step 2
The next step you would want to do is to go through the mixer channels and manually turn off all EQs, Reverbs, Delays, Compressors, and Limiters - these effects aren't part of sound design and arrangement. It's better to turn them off to leave the most options for the audio engineer while processing your song.
Effects that are better to keep ON: Filtering automation, Gross Beat, Sidechain, Distortion, Overdrive, Chorus, Phaser, Flanger, Vocoder, Pitcher, other creative effects. Keeping them applied when exporting stems you will give the audio engineer an exact picture of your creative ideas.
IMPORTANT - turn off all of the effects on the master bus.
Step 3
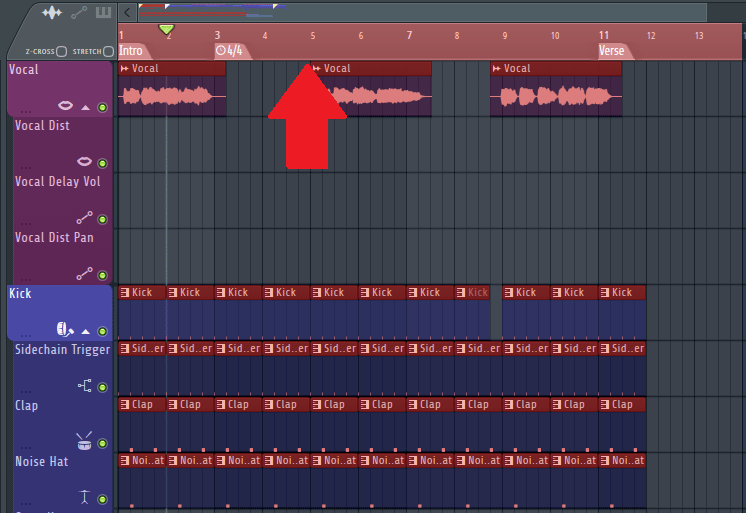
After that, you need to select the whole duration of your song including time for any decays, Reverb tails, and Delays – this way none of these will be cut off.
To do that press Cntrl (on Win) or Cmd (on Mac) and highlight the length of your song by left-clicking and dragging from the VERY beginning of the song until the couple bars after the last sound in your song.
Step 4
Click
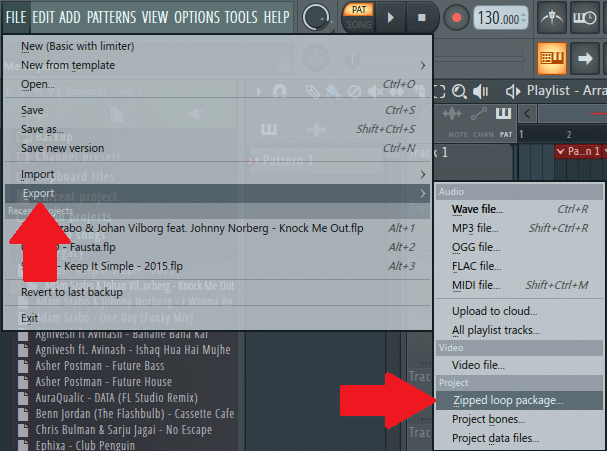
File – Export – Wave File
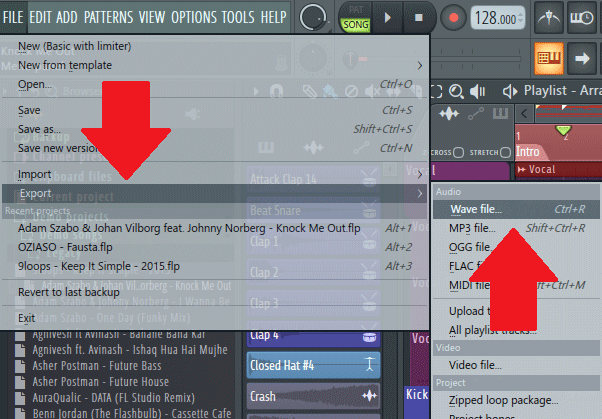
Here you’ll want to make a folder on your computer that you want to export into.
Include the song Name and Tempo information in the folder name.
RECOMMENDED ARTICLES:
- HOW TO REMIX A SONG
- HOW TO PERFORM ELECTRONIC MUSIC LIVE
- HOW TO MASTER MUSIC LOUDER AND WITH MORE COLOR
- HOW TO MIX ELECTRONIC MUSIC LOUD AND CLEAN
- WHAT IS MID SIDE PROCESSING
Step 5
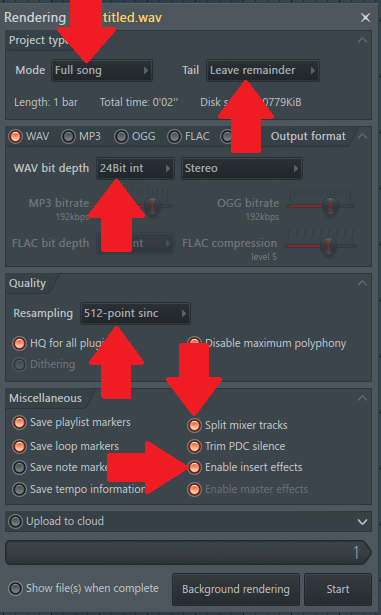
When the rendering dialog box popped up make sure to set all settings as shown on the picture.
Now just hit “Start” and give FL studio several minutes to complete the task.
NOW GET SOME COFFEE AND CHILL!
Depending on how many tracks you've used in the arrangement and how much CPU-hungry plugins and synth, it might take up to several minutes to get all of the stems exported.
Now you know how to create stems in FL studio - a piece of cake actually! :)
In case you’re curious here is a short explanation of the settings you just did.
Project Type section:
Mode - Full song. This way you set FL studio to export the stems for the entire length of the song.
Tail - Leave remainder – this will continue the render length to capture decaying sounds such as reverb or delay at the end of the song.
Output Format section:
WAV files at 24 bit are the best and most frequently used format for high-quality mixing and mastering.
Stem Export Quality section:
By default, resampling is set to 64-point sync which is ok for regular tasks. But since our goal is to get your song sound the best it possibly can I would recommend setting resampling quality to the max – to 512-point sync.
Of course, it will take longer to render your stems. But no worries! Modern computers have enough CPU so you shouldn’t worry about it – quality is the priority!
Miscellaneous section:
Split mixer tracks is one of the most important settings for exporting stems in FL Studio!
This means every Mixer track will be exported as a separate stem. This is why Step 1 was needed.
Make sure to check Enable insert effects – this way all of the creative effects that you left turned on in the mixer will be applied to the stems. And the mixing mastering studio engineer will hear the song exactly how you meant it to be!
BUT THAT'S NOT ALL!
Sometimes you need to share the entire FL studio project with all of the settings, plugins, automation etc. - for collab purposes for instance.
If you produced the song entirely with the stock sounds, it is super easy to do – you can just share .flp file.
But if you use third-party samples, sounds from your hard drive, live recorded vocals, or other sounds – then you will need to share them too because these sounds will not be included in .flp file.
To do that there is a simple ONE CLICK option!
Click File – Export – Zipped Loop Package
DONE!
Now you can have some coffee - FL studio will gather all of the samples and sounds in one folder and create .zip archive that includes all of the needed data.
You can share this archive with friends, send it to the mixing mastering studio – when it’s unpacked and the project started it will represent your song exactly how you produced it!
Any specific topic that you'd want to learn about?
Any other questions?
Feel free to ask - I'd love to help!
