In rap and hip-hop music you often encounter a situation when the engineer needs to mix vocals with an instrumental prepared beforehand (it is also called beat). The situation is specific due to the fact that the beat was pre-compressed and even maximized what pointedly wrong according to mixing canons! However, there is such a situation on the market, and beats are sold (or available for downloading) at most in this form. Nevertheless, there are still some tricks allowing engineers who work in rap and hip-hop genre to achieve high-end sound in this situation.
Let us start with beat…
So, as I’ve already said before, the instrumental is quite often aggressively compressed and maximized. Starting mixing with the search of voice balance with it, you won’t most likely get anything good – there isn’t room in the track left for the voice. Besides that, the combined vocal and beat signal will overdrive master bus and keep clipping. That is why the first your step will be to reduce the instrumental volume and along with it, tracks with the voice by all means. Hence, you will get headroom ready for further processing and avoid clipping as well as distortions connected with it.
I would like to specify one detail at once: the more the instrumental was maximized the quieter the finished song will be. These are the sound rules – prohibitive loudness is the result of natural track dynamics pressing. It is impossible to get it back anymore. So the louder the instrumental is, the quieter the final mix will be.
Transients
When we have created volume reserve, we are ready for setting about directly mixing. It is still early to get to vocals as they won’t get seated in music in the proper way. Maximization has deprived the beat of all natural transients. They were just cut with a limiter. That is why it is necessary to "liven up" the beat a little.
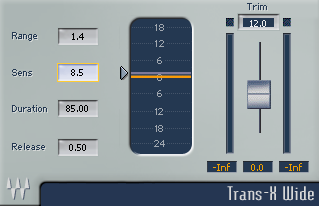
There are two options:
- to use a transient shaper (or an expander; each engineer has his own preferences)
- to mix samples of the kick and the snare/clap (depending on what sounds in the original track) to the instrumental; in this case, surely, mixing is now changing over to the production field. Nevertheless, it happens that it is the only one solution as there aren’t simply any transients in a flattened instrumental for regeneration.
If you made up your mind to opt for a transient with a shaper, I would advise TransX from Waves. The plugin is fairly flexibly set up, and there will be no difficulty in getting what you wish. Start with setting attack at 50 ms (the parameter is called Duration in this plugin), and Release – to the minimum. Sensitivity is around 7–8. Now generate transients gradually by increasing Range parameter. It is usually enough to boost it by 0.8–1.3 dB. When music comes alive, select the final attack value. Depending on the situation, its final value can vary from 50 to 100 ms. Sometimes even more as, for instance, in the tracks with 808 kick.
In case of samples mixing, do not aim at achieving their obvious audibility; there is not such a task. Controversially, put down volume faders to the maximum and add slowly until you feel that the mix gets dynamics again. This will be quite sufficient!
Stereo Field
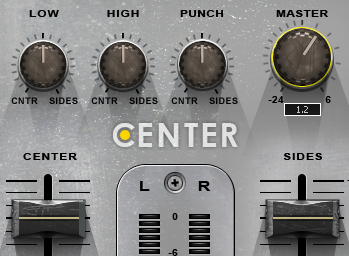
To achieve even better vocals cohesion with the beat, there is one more trick often applied – boost the volume of the side element of the track a little. The plugin WavesCenter is quite appropriate for this procedure, but any other plugin that works in M-S mode will be suitable. All we need is simply to boost side channel volume by 0.5–1.3 dB. This simple manipulation will give a better support for vocals in space and add width to the mix.
Equalizer
So, we have regenerated beat dynamics and enhanced the stereo field, but vocals still don’t want to get seated in music flawlessly. In this case instrumental equalization’s turn comes.
As a rule, the cause of the conflict between an instrumental and vocals is a snare drum (or clap), bright synths, hats - in general, everything what contains frequencies conflicting with basic vocal frequencies. As far as vocals get always seated along the center, so you need equalize only Mid channel. Moreover, the mentioned origins of the conflict are also precisely in the center of the mix.
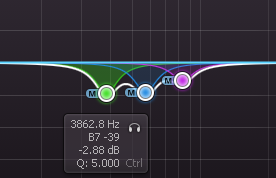
To solve this problem, any digital equalizer working in M–S mode will suit. Even a stock EQ with which any DAW is equipped. While playing back an instrumental and the voice simultaneously, make a cut around 3 dB deep (while Q is equal to 4–5) and keep it moving in the region of upper mids/highs until you find an interfering frequency. This procedure needs getting repeated 1–3 times (depending on the situation). When you find conflict frequencies, set the value of depth and width cuts.
As an alternative, you can use a dynamic equalizer controlled with a vocal track on the sidechain. The point of processing and search for conflict frequencies is similar to the previous case only with the difference that processing will work out only when the voice sounds.
RECOMMENDED ARTICLES:
- HOW TO RECORD VOCALS ON CELL PHONE
- HOW TO MIX RAP AND HIP-HOP VOCALS: PREPARATION
- HOW TO MIX RAP AND HIP-HOP VOCALS: COMPRESSION, EQ AND DE-ESSING
- HOW TO MIX BACKING VOCALS WIDE
- HOW TO MIX VOCALS WITH MUSIC BETTER IN 1 MINUTE
Vocals
You can get down to vocal processing only after the preparations described above.
1. Begin with removing all excessive noises (rustling of clothes, coughing, your friends presenting at recording and talking) from vocal tracks.
2. Then bring it to approximately equal volume with automation – it is very important that the signal coming in the compressor won’t have any radical fluctuations. Otherwise, too quiet parts won’t be compressed enough, and too loud ones – flattened and will lose their natural dynamics.
3. Cut low frequencies. All what is below 80 Hz is of no great music value and subjected to cutting. The tracks recorded with the microphone set up with a low frequency filter are an exception; in this case the second filtration will disservice.
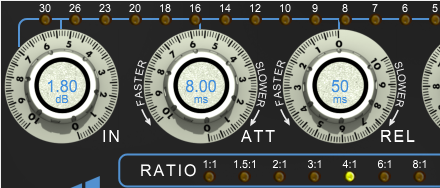
4. Compress. It will both give dynamics equability and help to get the voice seated into the maximized beat at last. By using emulations of analog devices, you will also be able to add the voice the necessary color due to the saturations with harmonics. At this stage, Arousor – the emulation of the legendary compressor Distressor – works perfectly. The compressor makes sound noticeably fatter and adds specific roughness – exactly that what is necessary for rap and hip-hop music! You should start with attack and release. Their values are given in the picture.
5. Apply parallel compression. This technique turned into compulsory during vocal mixing, and in this case, it is irreplaceable at all. Create the copy of the vocal track (or create the send to AUX bus) and flatten it with the compressor. For this purpose, CLA-76 from Waves will be perfectly suitable. In addition, set the attack to the maximum (value 1 corresponds the longest attack for this compressor), and the release – to the minimum (value 7). These settings let you achieve large compression values while keeping the musicality of the flattened signal as well. Then mix the flattened track to the main one – boost volume fader slowly until you feel that the voice cuts through the music confidently.
6. Saturate the vocal track with a plugin emulation of an audio tape. This will add more warmth to it.
7. Equalization. If vocals have been recorded in high quality, equalization will be slight, as a rule, this refers to adding some brightness with a shelf EQ and small mid frequencies enhancement to get more complete vocals in the mix. At this stage, you can also use the emulations of “hardware” equalizers. Except the equalization, they color the vocal track with their own saturation additionally.
8. Reverberation and delay, spatial effects, finish vocal processing. As far as traditionally it is accepted in rap music so that vocals sound “just in face”, forget about exuberant reverberation with a long tail. The room’s short sound will suit far better.
The limiter gluing instrumental and voice in a single track goes as the final stage. As we have been mixing vocals with the beat prepared in advance and gone through mastering, as a rule, additional mastering is not required. It is sufficient to glue music and vocals with a maximizer.
That’s all, the mix is ready!
Any specific topic that you'd want to learn about?
Any other questions?
Feel free to ask - I'd love to help!
